Shopping Cart
There are no items in your cart.
Continue Shopping
That's the yeast! And it's a great sign that you have a lot of good fermentation going on. Yeast is a good thing :)
Yes, air bubbles are caused by a change in air temperature, air flow or a buildup of CO2. It's totally normal to see some air bubbles on a culture during fermentation.
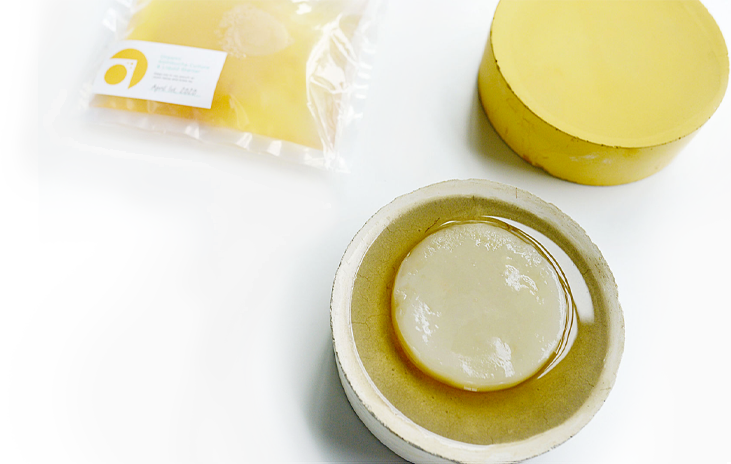
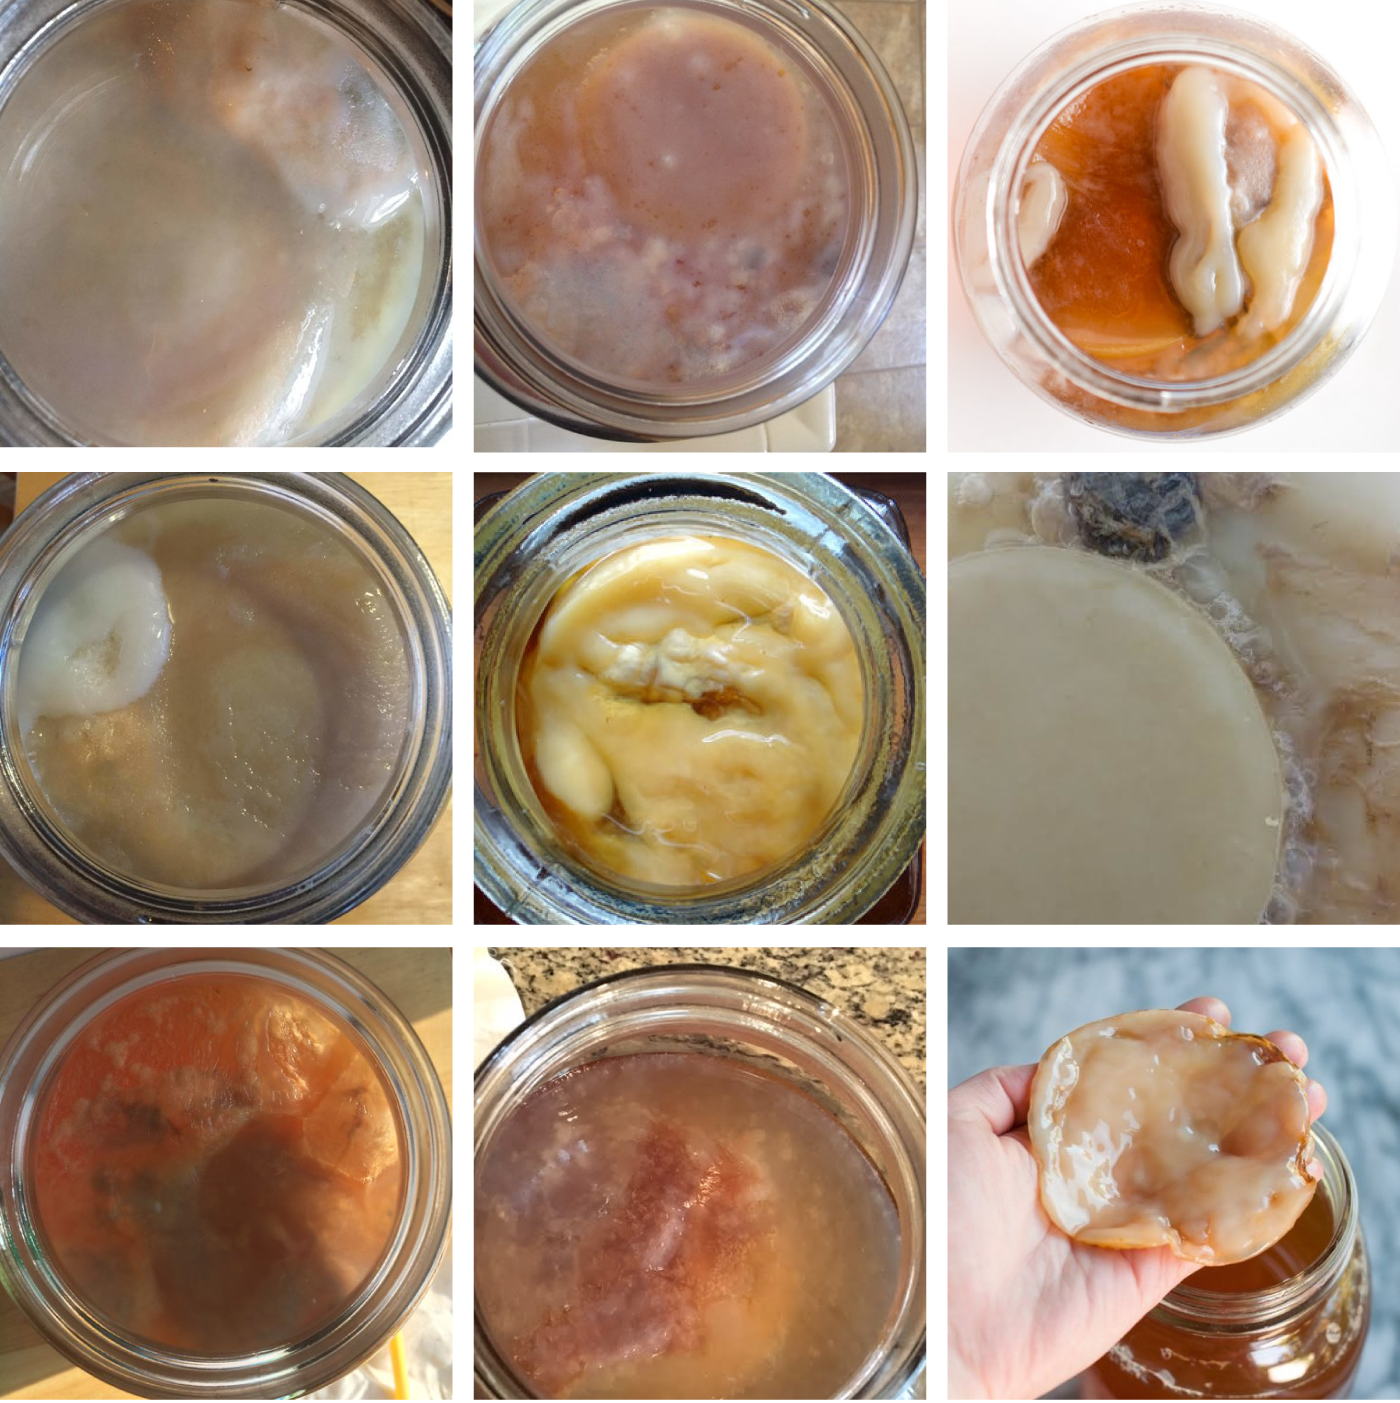
Most likely, your SCOBY is just fine! While mold and other abnormalities can occur during brewing, it's quite rare. But let's face it, kombucha cultures look strange and it’s often confusing to know what’s happening if you’re new to brewing. If you see some odd formations within or on top of your brew, it’s most likely that you’re seeing air bubbles or yeast. The yeast looks especially odd because it can appear brown, blue, green, pink or orange sitting underneath the iridescent culture that grows in across the top of the liquid during the first few days.
Try to be patient, and in the meantime, check out our gallery of healthy and unhealthy cultures below and see if your culture looks like any of these. If you're still not certain your brew is progressing as it should, please send an email with a picture to questions@thekombuchashop.com and we'll help troubleshoot!
A healthy kombucha SCOBY will have brown, stringy or blob-like debris attached to it (the yeast). It can be bumpy or smooth on top, and have clear dots or bubbles. When you drop your new culture into the brew jar along with the starter liquid, your culture can sink to the bottom, float in the middle, or float on top—all locations are just fine and will ferment your kombucha just the same. Here are some photos of beautifully weird looking (but healthy) SCOBYs in all their glory.
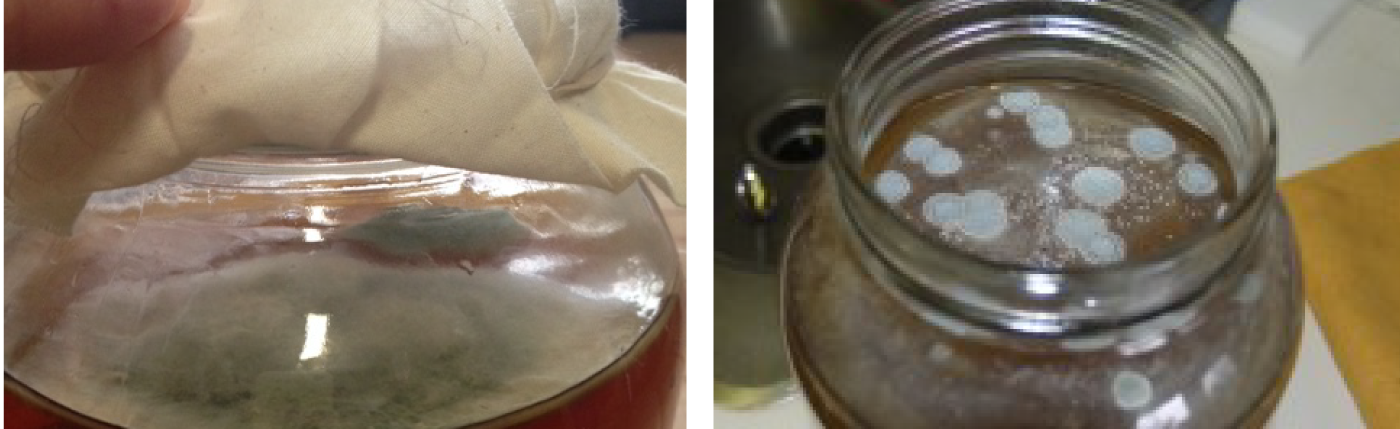
Just like the molds you would see on bread or cheese, an unhealthy kombucha culture will develop fuzzy blue, green, or white mold. It will look something like the below photos.
You can use both! We recommend using anywhere between 1-3 cultures to brew with. An old culture is ready to be retired after five or so brews, or if it turns dark brown and can be ripped apart easily. We recommend brewing with the newest cultures that you produce.
Oftentimes, your old and new cultures will form into one large culture which is fine as well. If your cultures continue to grow onto one another, be sure to keep the whole culture under 2 inches thick (height). Why? Because if your culture is covering the entire top surface of your brew, and is over 2 inches thick, it will start to inhibit the flow of oxygen to your brew, and also cause the sugar to be processed too quickly, throwing off the proper yeast/bacteria ratio. To reduce the thickness of a culture, simply peel off the oldest layer and discard, or simply cut it in half, like a half moon shape, and plop it in your brew.
Yup that’s fine, there was likely a fluctuation in temperature and it caused the culture to sink. It can sink, it can float on top or sit in the middle—it's fermenting all the same. Your culture is still working hard to produce a new culture that will cover the surface of your brew. Evidence of this new culture should appear by Day 7. It can take up to 2 weeks for a new culture to grow in on the top and complete the fermentation.
An old culture is ready to be retired after five or so brews, or if it turns dark brown and can be ripped apart easily.
We recommend storing it on your countertop, in a glass jar (the 1 gallon brew jar works well), placed in 1 to 2 cups of starter liquid (your previously brewed kombucha) and covered with a cotton cloth and rubber band. You can store it like this for up to 4 weeks, at which point it will likely need to be fed. To feed your culture, make one cup of hot caffeinated tea, and dissolve 1/3 cup of sugar in the tea. Allow the sweet tea to cool to room temperature and add it to the jar housing your culture & starter tea. Repeat this process every 4 weeks to ensure the health of your culture.
The most common cause of mold is weak starter liquid (when we refer to “starter liquid” we mean previously brewed, fully fermented kombucha). How does “weak” starter liquid happen? It can be caused during brewing in a few ways - first, by not allowing the sweet tea liquid to properly cool before adding the SCOBY and starter liquid to your batch. Second, it can be caused by brewing for too short of a time, so that the kombucha doesn’t fully ferment. Then, the next time you brew, you have a weak starter liquid to start your batch with, thus the pH doesn’t drop low enough to protect the brew from airborne mold. We like to recommend brewing on the longer side (typically a 12-14 day brew) as it will help prevent mold from happening, and, in general, lead to a more well rounded fermentation. Another common issue that can cause mold is that the average brew temperature during fermentation is too cold. Brewing below 68 degrees can lead to mold as the yeast and bacteria grow so sleepy that they stop fermenting and airborne microbes come in and take over. Other causes of mold are brewing with teas that have flavors or oils in them. We recommend using only plain black/green/oolong/white teas. Try always using at least some black tea as the base with a little bit of green, white or oolong tea for flavor (as opposed to doing just all green tea, for example). This will produce the healthiest kombucha cultures and most balanced kombucha, as black tea is highest in caffeine and tannins, which are important nutrients for the SCOBY. Also, make sure to use only refined/granulated sugar when brewing! Using any other type of sugar can throw off the fermentation and open up your brew to mold and other wild yeasts. Lastly, if your culture grew mold on top of it during storage, this means the top of the culture was exposed to too much oxygen and didn't have enough starter liquid to rest in. Next time you want to take a brew from brewing, be sure to leave your SCOBY with at least 2-3 cups of starter liquid so that you can push the culture down into the liquid every now and then, leaving it more protected. Other than those reasons, it's always possible that airborne molds floated over from kitchen produce, house plants, trash, etc. and got into your brew jar. Sometimes even the best kombucha SCOBY can’t stop it from happening. Try storing your brew jars in a more sterile area of your home if mold occurs.
It's perfectly safe to consume the yeast and scoby bits, although some people choose to strain it out along with fruit/etc during your second fermentation. It just depends on what you prefer.
For brew days 9 to 10, we would expect a culture to be about a quarter of an inch thick. However, the majority of SCOBY growth tends to happen between Days 8-14, so no need to worry just yet. Make sure that your brew jar is in the proper temperature range (68-84 degrees) as being too cold or hot can inhibit culture growth. Also, keep in mind that the first time brewing with the kit is usually the slowest. After a couple of brews, the culture and starter liquid begin to establish themselves in their new environment and fermentation happens faster. If, after a few more brews, your culture isn't growing in well, or your kombucha tastes off, then you may need a new culture/starter liquid pouch. Keep and set aside your current culture and starter liquid, and once you receive a new culture pouch you will be able to brew and determine if your culture/starter liquid was the problem, or if something else is amiss.
There are a number of things you can do with all of your extra SCOBYs. You can gift them to a friend (along with 1-2 cups starter liquid), compost them, or feed them to your chickens (they love SCOBYs). You can dry them out to make dog treats, or marinate and dehydrate them to make vegan jerky. You can flavor them to make kombucha gummies, blend them into smoothies, or use them as brightening face masks. If you’d like to put them into storage for future use, you can also make a SCOBY hotel. To start your SCOBY hotel, just place your extra SCOBYs into a glass jar (a 1-gallon brew jar works great), and completely submerged them in at least 1 to 2 cups of liquid starter (your previously brewed kombucha). Cover your jar with the cotton cloth and rubber band, and place it on the countertop or another well-ventilated area. You can store your cultures like this for up to 4 weeks, at which point they will likely need to be fed. To feed your cultures, make one cup of hot caffeinated tea, and dissolve 1/3 cup of sugar in the tea. Allow the sweet tea to cool to room temperature and add it to the jar housing your cultures & starter tea. Repeat this process every 4 weeks to ensure the health of your cultures.
We do not recommend storing your culture in the refrigerator. The cool temperature poses a risk—the yeasts and bacteria can go dormant, and have a hard time bouncing back to full brewing strength after they have been chilled. Sleepy yeast and bacteria leave your brew more at risk for developing mold. Instead, we recommend storing your cultures at room temperature in a glass jar (the 1 gallon brew jar works well), placed in at least 1 to 2 cups of liquid kombucha starter tea (your previously brewed kombucha) and covered with the cotton cloth and rubber band, then placed on a countertop or other well-ventilated area. You can store it like this for up to 4 weeks, at which point it will likely need to be fed. To feed your culture, make one cup of hot caffeinated tea, and dissolve 1/3 cup of sugar in the tea. Allow the sweet tea to cool to room temperature and add it to the jar housing your culture & starter tea. Repeat this process every 4 weeks to ensure the health of your culture.
Unfortunately, you won't be able to brew kombucha with just a SCOBY. The liquid starter is perhaps even more important than the SCOBY during the first few days of brewing. Without it, the pH of your brew won't drop to the necessary level and you won't have enough yeast and bacteria to ferment the sweet tea. Brewing kombucha is a learning experience! Next time just be sure to leave the culture with a few cups of starter tea to rest in so it doesn't drink it all up before you get home. And store it somewhere cooler (65 to 70 degrees) so the yeast and bacteria aren't as active and are instead just resting. Fixes for this situation, 1) order a new SCOBY & Starter Liquid pouch. 2) get some starter from a friend 3) try to find a bottle of totally plain, raw, unpasteurized kombucha at the store. Leave it out at room temp for a day, then use the whole bottle as your starter liquid along with your SCOBY.
Adding the starter liquid immediately lowers the pH of the sweet tea from roughly 5.5 to 4.5 or below. This is the recommended pH to prevent the growth of harmful bacteria, molds, etc. and is why your brew can sit out at room temperature just fine while brewing. The starter liquid is particularly important in those first few days before your new culture grows in across the top, which acts as biofilm to protect the brew below from airborne contaminants. Pretty cool, right?
If you are making a one gallon batch, you need between 1 to 2 cups of starter liquid. Scale up or down depending on how many gallons you are brewing. A half a cup of starter liquid is the smallest amount you can safely brew one gallon with, and even then we don’t recommend it! If you want to use only 1/2 cup of starter, we recommend brewing closer to ½ or 3/4 of a gallon. If you find that you don’t have enough starter liquid, you can use any plain kombucha (no added flavoring) as long as you allow it to sit and room up to room temperature before brewing with it. So if you placed some of your finished plain kombucha into the fridge, you could take some out to warm back up before using as a starter liquid. You could also try to find plain, raw kombucha from the store to warm back up and use as starter liquid.
No, we do not recommend adding in fruit or fruit juice during the initial fermentation phase. It typically will damage the culture and/or cause mold to grow. If you would like to flavor your kombucha, you should do so during a second fermentation.
Fruit flies can be a nuisance in warmer months. Try making a fruit fly trap: take a small mason jar and fill it a third of the way with apple cider vinegar (or red wine vinegar, white vinegar, etc.). Drop a very tiny dollop of soap in, cover with plastic wrap, and take a fork and poke a few small holes in the top. The fruit flies will go in but can't get back out and typically drown in the liquid. If you are having problems with bigger house flies, just make the holes slightly bigger for them. You’ll be amazed at out well it works!
Not to worry – you can simply tap the scoby back down into the liquid using a clean spoon or your finger. However, your culture might start to climb up again. This usually happens when there is strong yeast activity in your brew, creating CO2 which is pushing your SCOBY up and out. Simply tap it back down when you happen to see it pushing up and out again.
When you are done brewing your kombucha, you can either drink your kombucha plain, or bottle, flavor and carbonate it in a process often referred to as "The Second Fermentation.” This phase of homebrewing is where kombucha gets its well-known fizz. Here at TKS, we love to include fresh or freeze dried fruits, ginger, juices, spices, herbs and our handcrafted syrups for flavoring.
TO BOTTLE YOUR KOMBUCHA:
1) With clean hands, reach into your brewing jar and remove your culture(s). Place them in a glass container or jar of any kind.
2) Pour off 1 to 2 cups of your freshly made kombucha into the glass container housing your culture(s). This will be the starter liquid for your next batch. A good rule of thumb: pour off one cup if you are going to brew again right away; pour off two if you plan for your culture(s) to sit for a while before brewing again. Cover with any type of cloth (your brew jar cover, a kitchen towel, a paper towel, etc.) and set aside until you are ready to brew again.
3) Using a 16 oz. glass bottle, add 2-3 Tablespoons of your favorite fruits, veggies, juices and herbs to each bottle. If using freeze dried fruits or flavoring syrups, 1 Tablespoon is ample.
4) Pour your kombucha into each bottle using a metal funnel and fill them up to the top, leaving only 1 to 2 inches of air space between the liquid and the cap.
5) Seal the bottles and store in a warm, dark place for 2-4 days.
6) After 2-4 days, move your bottles to the refrigerator. If you want your kombucha extra carbonated, you can leave the bottles out for an additional few days before moving to the fridge, but be sure to burp them once a day to alleviate over-carbonation.
7) Once chilled, pop the top and enjoy your very own home-brewed kombucha!
*The best Second Fermentation vessels for making highly carbonated kombucha are glass bottles, and growlers with a long neck and a swing-top or phenolic cone cap. You can also use recycled store-bought kombucha bottles and mason jars, but they won’t create as much carbonation.
Carbonation is created when yeast converts sugar into C02 and alcohol. If you want to increase the C02 (carbonation), there are several things you can do to increase the fizz during both the first and second fermentation. First, let the first fermentation brew for longer. Allowing your initial brew to go for at least 14 days will strengthen all of the activity in your current brew and create stronger starter tea moving forward (making your future batches better). At the end of your first fermentation, there should be at least a small amount of natural carbonation that has built up. If you want serious levels of carbonation, then bottling for a second fermentation is a must!
Try these second fermentation steps to get your kombucha bubbly:
1) Fill your kombucha bottles closer to the top, leaving only an inch or so of space between the liquid and the cap. By reducing the amount of oxygen present in the bottle, more C02 is dissolved into the kombucha.
2) Increase the sugar content in your second fermentation. Either add fruit or fruit juice to each of your bottles (if you've already tried this and it didn't make it more carbonated, try adding 1 tsp sugar to each bottle).
3) Allow the second fermentation to go longer, try 4-7 days. Do note, you will need to start burping the bottles once a day or so after about 4 days of fermenting to ensure they don't explode (it's quite rare, but it happens). Simply open each bottle slowly to release the C02 and recap.
4) Your second fermentation should always be at room temperature just like your first fermentation. Make sure you are storing your bottles someplace warm (68 degrees or above). If you can’t find a warm place, place a heating wrap underneath or around the bottles. And remember, as soon as you place a bottle in the refrigerator, fermentation, and therefore, C02 creation, will mostly cease. So don’t put the bottles in the fridge until they have had an ample second fermentation.
5) If you are using old kombucha bottles from the store, try placing a small square of parchment paper underneath the cap to get a tighter seal. Bottles with a long neck that use swing top or poly cone tops are the best bottle type for building and holding carbonation.
6) Know that your kombucha will change from brew to brew based on a variety of factors including temperature, the length of brewing, the tea used, etc.. Additionally, each of your brews may not always reach the highly carbonated levels of commercial kombucha because many breweries add artificial CO2 during bottling.
7) Speaking of simply adding CO2, if your kombucha seems flat and you want to add some fizz in a hurry, you can always add sparkling (soda) water to your kombucha. Or, use an at-home carbonator, such as a Soda Stream, to inject CO2 directly into your kombucha.
You can store kombucha bottled in the fridge for many months. Like vinegar, kombucha has a very long shelf life due to its low pH. The shelf life can fluctuate based on various storage variables, but we tend to try and drink up our kombucha within 3 months. However, the fresher your kombucha is, the tastier it will be! So if you want it to always taste fresh and carbonated, we recommend drinking your kombucha within four weeks of putting it in the fridge.
Yes, with some caveats. If your goal of the second fermentation is to increase the carbonation, then it will always take the least amount of time to do it in airtight bottles from the get go. However, if you don’t mind taking a few extra days, then you can definitely just add fruit directly into your gallon jar of kombucha (after removing your SCOBY and starter liquid) screw on the plastic brew jar lid, pop it in the fridge for a few days to let the fruit flavor infuse into the booch, then take out and strain your kombucha into your bottles. If you'd like to build carbonation once your flavored booch is in bottles, simply let them sit at room temperature for a few additional days. Even with the fruit removed at this point, there will be enough residual sucrose (from the brew) and fructose (from the fruit) in the kombucha that letting the bottles sit on your counter for a day or two will build carbonation.
Nope! If you'd rather not do a second fermentation, you can certainly just pop your finished kombucha straight in the refrigerator in its jar and drink as is. Or, you can even keep it at room temperature and pour into a glass over ice when you are in the mood for a drink. It may not be as fizzy or have added flavors, but it will have the same great nutrition and taste.
Unfortunately, a bottle exploding is always a danger when doing a second fermentation. It's rather uncommon, but it can happen. Carbonation is created in a second fermentation when the yeast in your kombucha eats up the sugar and turns it into CO2 and alcohol (the bacteria then converts the alcohol into healthy acids).
If your bottle exploded, typically it means there was one of four problems:
1) You added just a bit too much fruit juice/sugar into the bottle
2) The bottle was sitting at too warm of a temperature (over 80 degrees) so the second fermentation happened too quickly
3) You let it sit for too many days
4) The bottles are poor quality glass-- if you believe this may be the problem, take a look at our bottles. They are all thoroughly tested and high quality so check them out!
Use a bottle brush! We have one available for sale in the shop. Also try using baking soda and vinegar. Let the bottles soak in warm water and vinegar, add baking soda and use a bottle brush to scrub off any stubborn residue.
Yes! It's very normal for new cultures to grow during the second fermentation. That is all that yeast and bacteria goodness in your kombucha continuing to ferment -- kombucha cultures will always continue to reproduce, even once they have air cut off in a second fermentation or are in the cold temps of the refrigerator. That's the power of living cultures! Simply strain them out before drinking if you wish.
You can always add fruit or flavorings at the point of serving! For example, if you'd like to have a cherry or raspberry flavored kombucha, but don’t want to do a second fermentation, simply pour yourself a glass or carafe of cold kombucha, and top it off with a little juice, fruit concentrate, or smashed fresh berries. Stir it up, let it sit for a few minutes to combine, and enjoy!
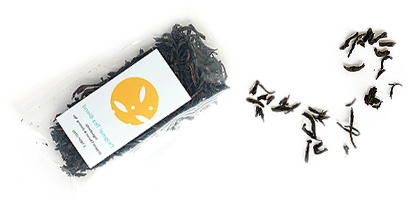
Use 1 cup of granulated sugar and 3 tablespoons of loose-leaf black, oolong or green tea. Or, 6 to 8 caffeinated tea bags.
Generally we don’t recommend brewing with flavored tea because the vast majority out there (the yogi and teavana type tea blends) have harsh oils or flavors that can damage your kombucha culture and encourage mold growth. Additionally, most flavored teas tend to be made with a majority herbal tea, not a majority black and/or green tea that is required for a healthy culture. The great news is, The Kombucha Shop has created a custom line of organic flavored tea blends so you can safely and easily brew delicious flavored kombucha. Our kombucha tea blends do not contain any oils, fragrances or antimicrobial ingredients that could damage your culture. Everything in our tea is real—real peppermint, hibiscus, yerba mate -— and proven to be compatible with kombucha cultures. We also use a strong black and/or green tea base that provides the caffeine and tannins needed to keep your culture healthy and promote the proper yeast to bacteria ratio in your brew.
When using only green tea, it's very common for the culture to not grow as thick or large. Your kombucha will still ferment all the same, the culture will just be thinner and more translucent typically. The kombucha should still be done brewing after a few weeks, even if the culture isn't very thick. The reason this happens is that green tea has far less caffeine and tannins than black tea, which are the two main sources of energy the culture pulls from. If you'd like to see your culture grow in a little thicker next time, or your fermentation to happen faster, we suggest using a combination of green and black tea. That way you can get the flavor and antioxidants from green tea, but your culture will get the nutrients it needs from the black tea.
Nope, sorry. We always cringe at the amount of sugar too! But as we like to say at TKS, the sugar isn't for you, it's for the culture. Kombucha cultures feed on sugar—it is a necessary piece of the fermentation puzzle (the yeast in the kombucha process the sugar for energy, in turn creating CO2 and alcohol). Lowering the amount of sugar in your brew will only harm the fermentation process. And remember, by the time your kombucha is finished fermenting, the vast majority of the sugar will have been processed out, leaving you with a healthy, low-sugar beverage.
It depends on how long you brew for; a longer brewing time will render less sugar in the final product. An average 14-day brew will yield just 3 to 6 grams of sugar per 8 oz of plain kombucha. Keep in mind, if you add fruit juice or fruit during the second fermentation, the yeasts will turn much of that added sugar into carbonation, but a small amount of natural sugars from the fruit may remain.
Yes, kombucha cultures have evolved to feed on caffeinated tea from the Camellia Sinensis tea family, meaning black, oolong, white or green teas. Without one of these teas rich in caffeine or tannins, your culture will grow weak and eventually die. Avoid flavored teas like Chai or Earl Grey and others with additional oils and herbs as they weaken the culture and encourage mold growth (No Yogi type tea blends!). We recommend using a pure black, oolong, white or green tea. A blend of green & black tea, or oolong & black tea, make a particularly great combo, both in flavor and for creating a healthy culture and brew. Black tea is the highest in tannins, so if you notice your culture growth has stagnated after a few brews of using white or green tea, blend some black tea back into your mix. For reference, our custom TKS Original Tea Blend is a combo of loose leaf oolong and ceylon (black) tea. Ceylon is a traditional black tea from Sri Lanka and Oolong is a mix in itself of fermented black and green teas. Oolong is a traditional Chinese tea and has been used in kombucha brewing for thousands of years. We recommend using organic and fair trade loose leaf teas when possible, as we feel they make all the difference in the quality of your final brew!
If you like a stronger and more caffeinated kombucha, we recommend using up to 8-10 tea bags or 4-5 tablespoons loose leaf tea. Anything more than that and it will start to taste bitter.
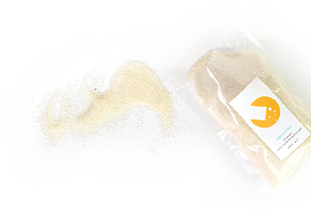
Yes. Kombucha cultures have evolved to feed on granulated white sugar and cannot properly ferment without it. Thick sugars like turbinado, sugar in the raw, and brown sugar are too difficult for the culture to break down and process. Also, do not use alternative sugars like coconut sugar, honey, stevia, etc. as the culture will struggle to thrive and ferment. For reference, we use Organic Cane Sugar in our brewing kits and offer it in The Shop!
The only two items you need to purchase after the initial batch are tea and sugar. So the cost of each succeeding batch depends on the quality of those ingredients, and if you add fruit or other flavors during the second fermentation. On average, the cost falls somewhere around $1.50 to $3.00/gallon. You can brew kombucha for less or more, but that is going to be your average continual cost per gallon of kombucha.
It's important to keep your brew jar as close to 70º - 80º F as possible – that’s where the culture produces the most balanced ratio of yeast to bacteria. As you'll soon discover, kombucha brewing is all about finding balance.
It's fine if your brew drops as low as 66-68º F. Just know it may take three weeks to fully ferment. However, if it goes below 68º for an extended period of time it can be more prone to developing mold, as the bacteria and yeasts will start to go to sleep and can’t do their jobs properly. So try to keep it 68º F or above.
If your home is very warm in the summertime, or you have a heating wrap turned up too high, it's important to keep your brew jars somewhere cooler so they won't get too warm. It's best to not let your brewing jars get above 82º-84º F for too long or your yeasts will begin to overpopulate and throw your brew out of whack. Additionally, your fermentation will happen too quickly and you're likely to end up with kombucha vinegar.
A culture can hit 95º - 100º for a short time and survive just fine (like during shipping). Optimally, you want to be able to keep it consistently in the mid 70º's to upper 70º's at the most. If the temperature goes above 88º for more than a few hours, the bacteria get out of control and throw off the brew. That is why our temperature gauge stops reading above 88º — because the temperature really shouldn't ever be higher than that.
Not to worry! Kombucha cultures can be flash frozen during transit and will bounce right back once it has thawed. Simply leave the culture pouch on your kitchen counter for a day or two and allow it to fully warm back up to room temperature. Once it's at room temp, you can go ahead and brew with it :)
We are located in Madison, WI so we're experts at brewing in cold temps! Here are some of our top tips for keeping your brew warm:
1) In the winter, we prefer to move our jars up to a high shelf in a warm room, like on top of cupboards or a tall bookshelf. Sometimes this means moving the brew jar upstairs, where it tends to be warmer (if you have a multi-story home).
2) If your brew jar is resting on a cold countertop, place a book, towel, or cutting board underneath it for insulation.
3) If taking those steps doesn't keep the temperature above 68º F, we highly recommend picking up one of our custom heating wraps. We designed them exclusively for kombucha home fermentation. With four temperature settings, it will keep your brew in the perfect range year round!
Additionally, you may be wondering about keeping your bottles warm for the second fermentation. You'll want to store your bottles somewhere warm during the second fermentation (mid 70º's if possible) to ensure yeast is actually fermenting the sugars in the bottle and creating that much desired carbonation. If you can't keep your bottles consistently above 70º F, you won't create carbonation. If you don't have a warm spot in your home, we recommend laying our kombucha heating wrap flat on your countertop, and placing the bottles directly on top of it in a line. They'll ferment and carbonate much quicker, typically 2 days.
If your temperature gauge isn't showing any readings, it's very likely that the temperature of the liquid is falling somewhere outside of 58º - 88º F, so it can't read it. (Typically, this happens when mixing in the warm sweet tea and the liquid is still above 88º)
If the temperature gauge is reading 2 or 3 colors, this means the actual exact temperature is lying somewhere in between the numbers on the gauge. Green indicates the correct temp. If green is not visible, the temperature will be midway between what is illuminated by tan and blue.
The slow growth/fermentation could be due to a low temperature. If you are brewing at the lower end of average (68º - 72º F), let it brew for another 5-7 days and then give it another taste test and pH test. Brewing at a lower temperatures is fine, it just usually takes a little longer.
Not to worry, if your kombucha looks, smells and tastes good, then it is good. Our tongues are our most useful instrument when brewing kombucha; pH strips are provided as a teaching tool and a "just in case" measure for those folks wanting a little added reassurance. Go ahead and enjoy your booch!
Click the link to download a PDF of our brewing instructions!
Unfortunately, we're not aware of any affordable and/or accurate home tests. Here are a few things you can assume without testing: Your plain, home brewed kombucha will be roughly 8g of sugar per 16 oz. That is a pretty tried and true measurement, based off of an average 14-day brew. Just remember to account for any juice/fruit etc. you add in a second fermentation. As for alcohol, it takes highly technical brewing skills and special yeasts (usually brew masters in commercial breweries) to get the alcohol up over 1% alcohol by volume. They are using a variety of alcohol tolerant yeasts, adding large amounts of quickly digestible sugars, aging brews, etc. For a home brewer like yourself, consuming your bottled kombucha within a reasonable time frame (3 to 4 weeks), you can rest assured your brew is at or well under the legal limit of .5%.
No, most store-bought kombucha is not pasteurized - it is raw, just like your homebrewed kombucha. While we cannot guarantee the safety of your home brewed kombucha, it is actually safer than fermenting/canning many other food items at home due to its very low pH level. The low pH level of kombucha makes it difficult for any unfriendly organisms to survive in it. Like most hand-crafted kombucha breweries out there, we feel raw kombucha is best because the raw state is what makes kombucha so healthy to drink—the living bacteria, healthy acids and enzymes would be destroyed upon pasteurization.
Not really, and we don't sell continuous brew equipment because many brewers struggle with it. First, it's much harder to consistently brew healthy and balanced batches of kombucha. Since there is no set time-table for fermentation with continuous brewing, the pH levels can vary greatly, leading to anything from mold (high pH) to kombucha vinegar (low pH). It's also easy for there to be either too much yeast (causing it to turn sour too quickly) or too much bacteria (leading to flat, slow-fermenting kombucha). Also, the continuous brewing spout has a tendency to get clogged with yeast fairly quickly and often. This means that you have to take all of the kombucha and SCOBYs out of the vessel to unclog the spout, which leaves you with about the same amount of hassle as if you were batch brewing.
No, we don't recommend using cheesecloth. The holes are too porous and allow fruit flies and other airborne contaminants to get in the brew. If you need a brew jar cover in a pinch, we recommend cutting up an old t-shirt, or using a paper towel or coffee filter. We also offer a variety of custom made brew jar covers on our website for optimum brewing!
It's ok to have other fermentations going on in the same room so long as you don't mind non-kombucha yeasts possibly getting in your brew. The main concern is if anything goes awry with your other fermentations, it could cause problems with your kombucha. Small risk, but it's there. If you have enough space, it's not a bad idea to keep fermentations separate from one another.
Unfortunately, it sounds like your batch has turned into kombucha vinegar. The good news is that kombucha vinegar makes really great (and potent) starter liquid for your next batch. So keep a cup or two to brew your next batch with. You can also use it as a great base for salad dressings, household cleaners, and even hair tonic! It might not be tasty to drink, but if you Google around you’ll find plenty of other cool uses for it.
Below are the various types of bacteria and yeasts found in most raw kombucha.
Acetobacter is an aerobic (requiring oxygen) bacteria strain that produces acetic acid and gluconic acid. It is always found in kombucha. Acetobacter strains also build the scoby mushroom. Acetobacter xylinoides and acetobacter ketogenum are two strains that you might find in kombucha.
Lactobacillus: A type of aerobic bacteria that is sometimes, but not always, found in kombucha. It produces lactic acid and slime.
Pediococcus: These anaerobic bacteria produce lactic acid and slime. They are sometimes, but not always, found in kombucha.
Gluconacetobacter kombuchae: is an anaerobic bacteria that is unique to kombucha. It feeds on nitrogen that is found in tea and produces acetic acid and gluconic acid, as well as building the scoby.
Saccharomyces includes a number of yeast strains that produce alcohol and are the most common types of yeast found in kombucha. They can be aerobic or anaerobic (requires an oxygen-free environment). They include Saccharomycodes ludwigii, Saccharomycodes apiculatus, Schizosaccharomyces pombe, Zygosaccharomyes, and Saccharomyces cerevisiae.
Brettanomyces is another type of yeast strain, either aerobic or anaerobic, that are commonly found in kombucha and produce alcohol or acetic acid.
Zygosaccharomyces kombuchaensis is a yeast strain that is unique to kombucha. It produces alcohol and carbonation as well as contributing to the mushroom body.
We recommend using filtered water, spring water, or purified water from reverse osmosis. You can use water from the tap if you run it through a Brita type filter, or if you have a built-in filter in your fridge that works too!
No, simply rinse with hot water and distilled white vinegar if you have it. You can use a little soap, but not antibacterial soap. Always rinse well before brewing or bottling.

Subscribe to our once monthly newsletter for exclusive
discounts on all your kombucha brewing needs.